We receive countless enquiries as to what the correct methodology is for installing porcelain tiles. If not laid or fixed correctly, the results can be less than satisfactory, resulting in uneven or ugly appearance, or worse, damaging the tiles. Over the course of the coming months we will be publishing a number of technical notes that provide an overview of the nuances involved in different installation methods for different tile products. Today we are looking at how to install external porcelain tiles.
1. PREPARATION

As with most construction techniques, preparation really is key. When laying external porcelain tiles within an outdoor space it is important to first dig out the area, ensuring that the ground is stable and the area is around a depth of 200 mm.
Next up you must lay compacted aggregate across the area. We recommend Type1 MOT, which is an approved granular subbase material usually comprised of limestone and granite. The aggregate should be compacted to around 100-150 mm depth, ensuring it is stable.
Once this is done you should apply your porcelain primer to the back of the tiles. Using a brush or a roller, give each tile a good covering, and make sure it’s wet when you lay it on to the mortar (outlined in step 2).
Mix ratio: 1.6ltr – 5kg
Working time: 60 mins
Drying time: 10 – 15mins
Coverage: 5kg – 7m2
2. LAYING
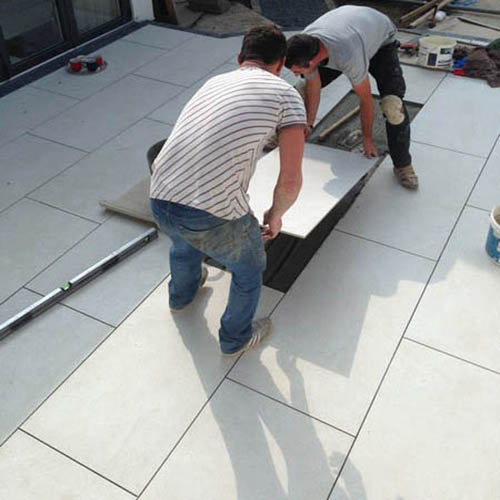
Then comes the process of laying. You must first set out markings for the area to be tiled, using a horizontal level line combined with a second sloped line to create a very subtle fall as the tiles move away from the property. This fall should be at a ratio of 25 mm over a length of 1.5 metres. Lay the tiles (which you will have primed as per step one above) onto Mortar, which should be laid from between 25-80 mm thick.
Mix ratio: 3.75ltr – 25kg
Drying time: 24hrs
Coverage: 50mm – 0.3m2
25mm – 0.6m2
3. GROUTING
Almost as important as laying the tiles, grouting is the final stage of the process. Before beginning the tiles should be wet, and should remain moist throughout the process. This is important to remember.
Make sure the joints are between 3-25mm, completely clean and dust free. Then, brush the grout into the joints at a 45- degree angles using a long-handled brush. You must keep applying the grout until the joints are filled and void free. All the while, remember that you must not allow the surface to dry out.
After ensuring each of the joints are completely filled, compact them and finish off with a jointing tool. If you notice an voids reappear at this stage you will need to refill and refinish. After you’re happy with the grouting, brush off any excess.
The approximate drying time for final grouting is 24 hours.
If you need any assistance correct tile installation, recommendation or technical assistance, the team at Meraki Ceramics will be delighted to assist you.